Showing posts with label Math. Show all posts

Saturday, January 25, 2020

UPS Math Strategy


As a reading and math interventionist, I work with students who are having difficulties in class. They somehow manage to develop misconceptions from the most well-intentioned best practices. Some of my students were ineffectively utilizing the CUBES strategy that they had been taught for word problems. I did some research and found that many people discourage its use because it can be problematic.

I especially enjoyed reading a post by Annie at Show Your Thinking Math. You can read her full post HERE. She gives some great examples for when CUBES fails to work and some helpful guidance on teaching word problems. Here's an example from her that reflects what I was seeing in class:

Annie takes away 3 cookies from her brother. She puts the cookies in her pile of 7 cookies. How many cookies does Annie have?

Most of my students would circle the numbers 7 and 3, underline takes away, and subtract to get 4 cookies. However, this is actually an addition problem. It should be 3+7=10!

She convinced me to abandon CUBES and find something more focused on getting at the heart of understanding word problems.

I found the UPS Check strategy was recommended often, but it needed some adapting to meet the needs of my particular students.

The first step is the hardest!! UNDERSTAND

I will start with NUMBERLESS word problems. Using this format forces students to focus on what the problem is actually saying instead of jumping into values and a solution too quickly.

Laura from Where the Magic Happens Teaching has an AMAZING post and it has a FREE set of numberless word problems that were perfect for my kids! You can visit her HERE for your set. 

My goal during this phase is to get my kids to read problems one sentence at a time. We will draw, act out, or explain what happened. We will keep rereading and adding a sentence until we know what actually happened in the word problem. Then, we will construct a number sentence and I will phase in one value at a time until the unknown element is clear. 

The Second Step should be easier then: PLAN
We spent the whole first semester working on fact fluency and addition and subtraction strategies. They should have strategies ready to use "on the run". Once we have our number sentence, my students will plan how they wish to solve it. We try to use the algorithm as little as possible. Most of my MTSS math kids are more visual and prefer other strategies, but it is a viable option for some. 

Lastly, we will SOLVE AND SHARE. 
This is where I made some changes to the UPS Check Strategy. I embedded the check part into the questions for this step. Since my school is working on the 4C's I need my kids to communicate mathematically. I also want to hear them use domain-specific vocabulary. So, they will explain their thinking to someone (me, their partner, the group), and we will scaffold that towards explaining their thinking in writing. 

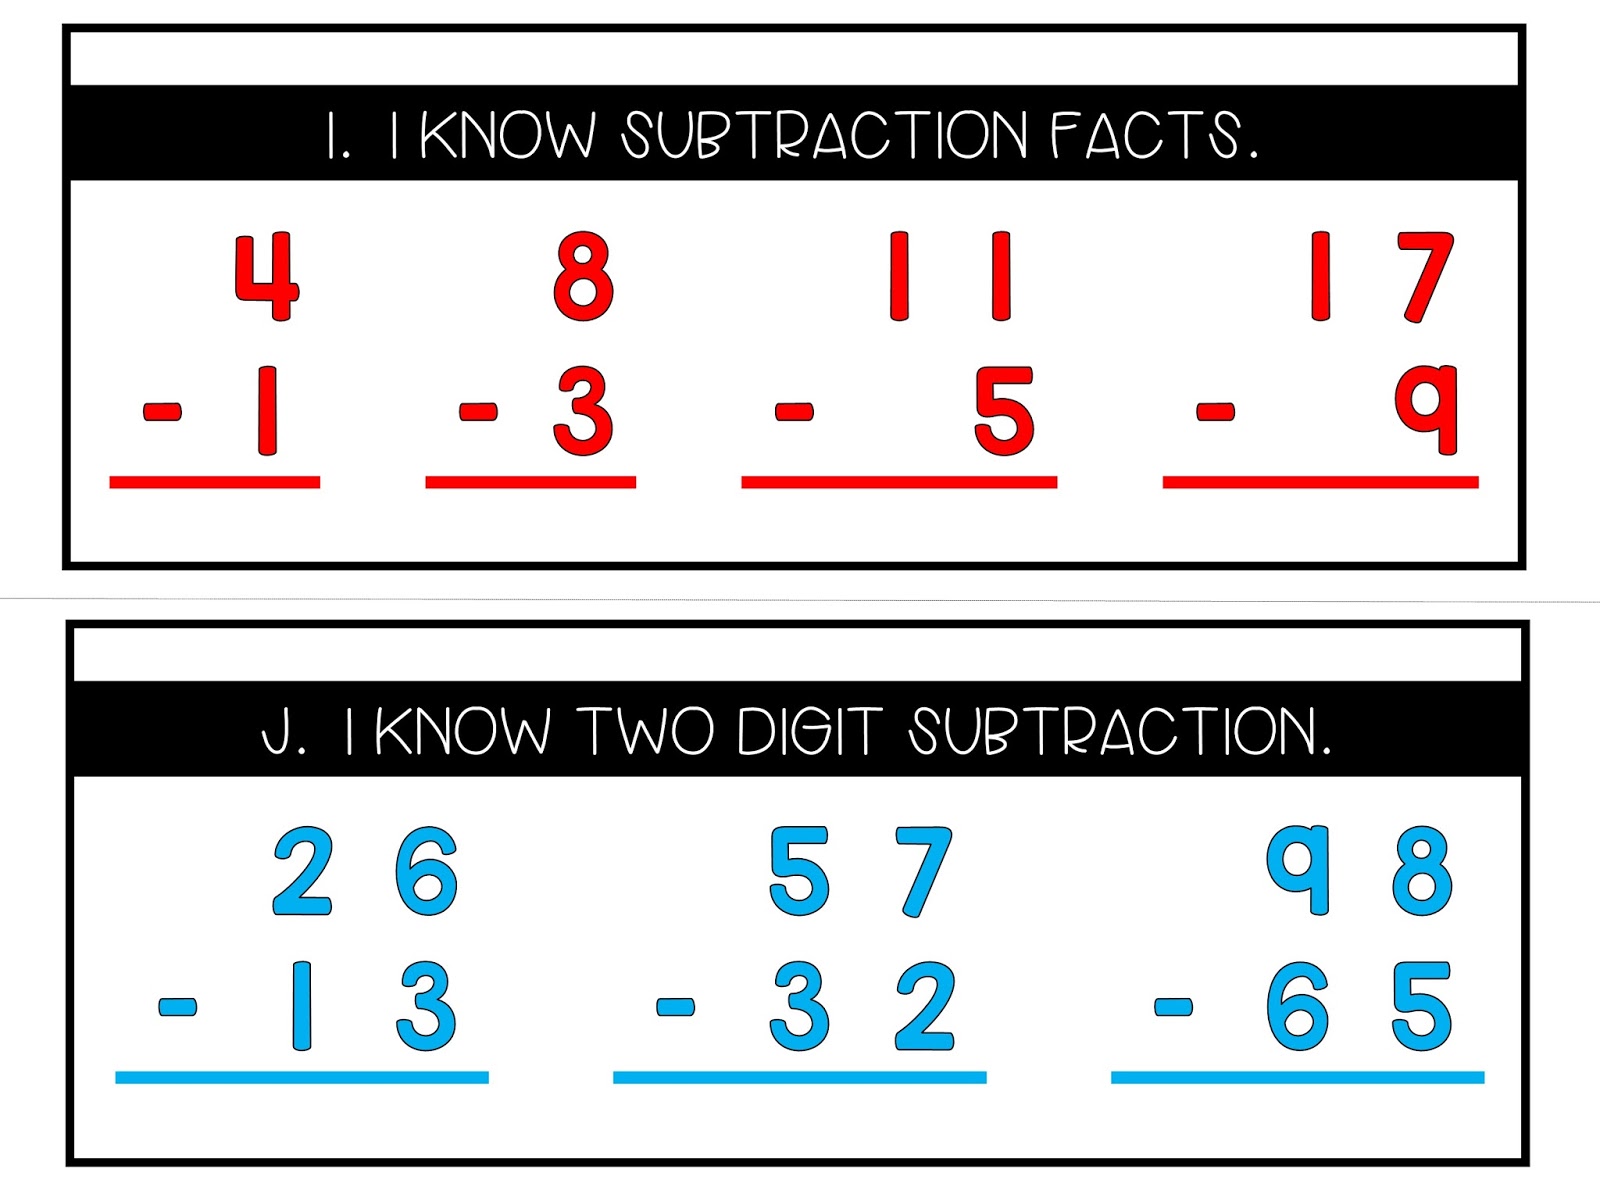
Since I will camped out on word problems for a while, I needed a bulletin board to use routinely. If you would like to have mine, you can download it through Dropbox HERE or on the picture below. It can be converted into an anchor chart on chart paper or bound into a flipbook if you lack bulletin board space. 

I would love to hear from you! How do you approach instruction in word problems? 

Sunday, September 11, 2016

Basic Math Assessment {Free & Editable}


Over the summer, I designed a quick math assessment to use for both baseline data and progress monitoring of my Title I math students. I needed it to have a few key components.
1. I needed it to involve NO reading.
2. I needed it to give me a quick picture of strengths and weaknesses with BASIC math skills.
3. I needed it to align to 2nd grade standards and our curriculum.
4. I needed it to be quick and also portable.
5. I needed it to grow in complexity throughout the year.

I came up with a spiral bound flip book and some recording sheets that met all of my needs. I hope that you will find these to be user friendly. If you need to tweak a few things, I am also making these editable with PowerPoint.

I printed, laminated, cut, and bound all of the student pages to make a flip book. It has been my experience that students are far less anxious about testing when they can hold something in their hands.
For tasks A - L, students should (at a MINIMUM)  be able to do the red tasks. If they could, I went on to the blue. If they did the blue correctly, we attempted the green ones.
Here's a brief picture walk through each task in the flip book.

Task A: red: count from 1 to 20, blue: count from 84 to 112, green: count from 285 to 310.
Task B: Tell how many hundreds, tens, and ones make each number.
Task C: red: count by fives, blue: count by tens, green: count by tens using 3 digit numbers
Task D: Each set involves: reading the number, telling h/t/o, and expanded form.
Task E: For each number, tell one more/one less, ten more/ten less
Task F: Basic addition facts
Task G: Two digit addition (with one regrouping problem)
Task H: Three digit addition (with regrouping one time)
Task I: Basic subtraction facts
Task J: Two digit subtraction with no regrouping
Task K: Three digit subtraction (with regrouping one time)
Task L: Odd/Even (MUST explain their reasoning)
Task M: time to the hour, half hour, and five minutes
Task N: counting coins (dimes/pennies, larger total, total over $1)
Task O: Counting bills and coins
Task P: Students will interpret the graph to answer 4 questions.
Task Q: Name fractions (1/2, 1/3, 1/4)
Task R: Name each plane shape.
I used the following forms to record student responses. I keep my paper hidden from the students so that they cannot see what I am writing. I give checks for correct responses and write down what they said for incorrect responses. They seem to be less nervous when you make marks for every response. Recording their incorrect responses gives me powerful data about their errors, too. Here's a quick demo student packet.

Let's take a quick peek at the data on "Amy Smith".
 Page 1: Amy's overall score was 18. I set the bar at 27 in the fall. So, she would definitely benefit from math interventions. She had difficulty with rote counting over 109.
 Page 2: Amy needs help with expanded form and 10 more/10 less than a given number.
 Page 3: Note the F and N I wrote in on the addition section. Amy relied on either her fingers or a number line on the wall to solve these problems. She needs help with automaticity. She clearly needs help with subtraction. She added. Then, she added incorrectly. Then, she saw no change at all.
 Page 4: Odd/Even: Amy probably guessed even. She couldn't give a rationale for her answer. She inverted the hour and minute hands on time to the hour. She couldn't count dimes and pennies.
Page 5: Amy has some basic data analysis skills. She is on the verge of combining two items, but really struggled with finding a difference. Fractions were a foreign concept. She needs a little brush up work on her plane shapes.
Lastly, I added a "notes" section where I can record anything that I need to remember to mention to her teacher or bring up in our next RTI meeting.

Benchmarks: As I said earlier, I expect a minimum score of 27 in the fall. I increase it to 50 in the winter. I expect the full 70 points in the spring.

If you think that this editable flip book and scoring sheets would be helpful to you, please download the student flip book {HERE} and grab the teacher's scoring sheets {HERE}. Don't worry if the files look "WONKY" in Dropbox. They should look perfect when you open them in PowerPoint. :)

I have also fully revamped by reading assessments. I hope to share those later this week. If I can answer any questions you have, please comment below or email me. Thanks!!


Thursday, December 3, 2015

Fun with Place Value

Place Value comes in at a close second to subtraction with regrouping on the concepts that are the most difficult to teach to my RTI population. Often, these sweeties need a more concrete/visual/kinesthetic approach to math. So, here are a few of our favorite activities from our place value unit. I hope you find something useful for your classroom!

1. I really needed to make the value of the numbers more visual. Of course, we started out with base ten blocks and the usual stuff, but I wanted a way for them to really "see" and understand numbers in their expanded form. Before we started this, the students were reading numbers like 873 as 8-7-3 NOT eight hundred seventy-three. When they wrote that number in expanded form, they may have written 8+7+3 = 873. So, I whipped up these expanded form cards. We spent a lot of time building and deconstructing numbers. I just printed out this set on 3 different colors of copy paper. This made a HUGE difference with my students. You can grab this set for free {HERE}

2. Once we were rockin' and rollin' with reading numbers, understanding basic place value, and modeling numbers in different ways, we did some REAL rockin' and rollin'. We played Place Value Musical Chairs. Each student picked a numeral. We started out with 4 kids and 3 chairs. We cranked up some Christmas music and the game began. When I cut the music off, they had to sit in an empty chair representing the hundreds, tens, and ones of a number and hold up their digit card. The kid who was "out" got to choose if they wanted to ask or answer questions about the number that the other students had created. If they chose to ask, they had to come up with questions to ask the rest of the class about number. If they chose to answer, the group posed questions to them about the number. It was a BIG success! Everyone was involved and engaged! 


3. Once we had a handle on Place Value Musical Chairs, we expanded the game to include 7 kids. When the music ended, 6 kids would create two 3 digit numbers. The kid who was "out" had to compare the numbers and use his/her body to create the >, <, or = symbols. 

4. Last, we played Roll and Compare Place Value by The Primary Techie. The game uses a sound signal for students to roll a die. We used some giant foam dice. Then, the spinner lands on a place to record the number they rolled. They build two 3 digit numbers. Finally, they compare the numbers they have created. This is a great assessment and WAY more fun than a plain worksheet! You can find it on TPT {HERE}

These are just a few of my favorite things that are VERY inexpensive or even FREE for teaching place value. I hope you found something useful! 

Saturday, November 21, 2015

Number Reversals

Oh my goodness, if I had a nickel for every time a parent has said to me, "He/she still writes some letters and numbers backwards. Does he/she have dyslexia?", I could apply for early retirement! Written letter and number reversals have absolutely nothing to do with dyslexia! So, why do some kids persist in making these reversals?

1. It could be a fine motor skill issue.
2. It could be immaturity or even a later birthday. These skills are often developmental.
3. My personal theory is that practice does not make perfect. Practice can make permanent. Children are learning to write at a very early stage of development now. Handwriting instruction has been terribly neglected since other skills have taken priority over it. Some children have written their letters/numbers backwards for so long that it has become a habit to do so. 

So, what can we do? As an RTI teacher, I see a lot of students with issues like this. My assistant and I have had a great deal of success with a few simple strategies. 

MAKE IT TACTILE!
Try placing salt in the bottom of an empty pencil box or travel soap container. Let them form the letter/number with their fingertip in the salt.
Let them rub a fingertip across fine sandpaper.
Write it in the air. Use your finger as an "air pencil".
Shine it on the wall with laser finger pointers.
Line the kids up. Let them form the letter/number on the back of the kiddo in front of them.
Tickle write it! (My kids LOVE this one!) They use their own finger to form the letter/number on the wrist/forearm area of their other arm.

MAKE IT VISUAL!
I implemented a new resource this year, and absolutely LOVE it! We used this resource on my SMARTboard during our reading warm up time before small groups begin. I purchased this animated PowerPoint from The Primary Techie. Here is a video of her explaining several cool ways to use this program. You can purchase your own copy of this product {HERE}


MINIMIZE PENCIL LIFTS!
We noticed that many students who were struggling with b/d and number reversals were writing in a way that had multiple pencil lifts. For example, rather than making a b with one continuous motion, they were writing a "stick" and then adding a "ball". They often forgot the order of those elements. We showed them how to flow write a b and a d. The motion feels completely different. MOST of their errors DISAPPEARED! 
DIRECTIONALITY MATTERS!
Now, that we have addressed their letter reversal issues, we are about to tackle number reversals. I searched high and low on the Teachers Pay Teachers site for number formation products. I found so many that were cute or had great poems. However, if the poem for teaching how to write a 3 says, "Go around the tree and go around again to make a 3!", they can follow those steps and still do it backwards! I needed something that specifically taught directionality. 

Then, I remembered that when I taught first grade nearly 20 years ago, we sang a song about each number. The song didn't teach directionality though, so I tweaked it meet my needs. Each number has specific directions sung to the tune of "HERE WE GO ROUND THE MULBERRY BUSH". We are going to project the pdf onto my SMARTboard and use our tactile strategies from there. We will also use laser pointers, our fingertips, or the SMARTboard pens to trace and write our numbers as tickets to our small group tables. Here is a sample page from this free resource. 

If you would like to check out this free strategy, grab your copy {HERE}. What strategies work for you? I would love to hear from you!

Monday, July 20, 2015

Subtraction Fact Fluency Freebie

How do you keep track of your students' fact fluency? In my 2nd grade intervention classroom, progress monitoring fluency for my math students is a major goal. So, I decided to make it fun.. like a journey..or a quest! For our addition facts, we journey through Oz as we learn each set of facts.  You can read more about that adventure and grab the program freebie in this previous post. The kids enjoyed it so much that I decided to add in a Peter Pan/Neverland theme for subtraction!

I hang up a jumbo pocket chart to hold the character cards and student name pieces. The students' names are written on die cut yellow stars. When they have achieved their goal, it gives the effect of a pictograph of names. You can see a glimpse of the set up (without the names) in this photo from an Instagram post last year. 

As soon as we introduce subtraction, I reveal the first character goal and post the character card and goal on the pocket chart. I tell the kiddos that if they meet the goal that they will earn the character and a matching treat. The character cards look like this:

All week long (and longer if needed to achieve their goal), we practice our math facts. I like to use the free subtraction fact sheets found {HERE} at www.math-drills.com. Scroll down to number 8 and select horizontally arranged subtraction questions. Then, print off an entire sheet of individual fact practice. Copy the sheet for your students, and then cut them into 4 days worth of practice strips. Easy Peasy Mac-n-Cheesy!

I set different goals for students. Often my tier 3 students are just working on getting correct differences while my tier 2 students may be more focused on correct differences in a given amount of time. If their goal is achieved, they receive the treat for their character and a little certificate in a Ziploc baggie. They take them home to share their accomplishment with their families. It is an easy and relatively inexpensive way to celebrate their work and communicate their progress to their parents. 


As you can see, I updated the font! :)
You can grab the whole program as a freebie {HERE} in this Dropbox link! 
I hope you will find these helpful! :)


Thursday, July 16, 2015

Addition Fact Fluency Freebie

How do you keep track of your students' fact fluency? In my 2nd grade intervention classroom, progress monitoring fluency for my math students is a major goal. So, I decided to make it fun.. like a journey..or a quest! For our addition facts, we journey through Oz as we learn each set of facts.  

During preplanning I hang up a jumbo pocket chart to hold the character cards and student name pieces. The students' names are written on pieces of the yellow brick road. When they have achieved their goal, it gives the effect of a horizontal bar graph of names. You can see a glimpse of the set up (without the names) in this photo from last year's room reveal. 
Beginning the first week of school, I reveal the first character goal and post the character card and goal on the pocket chart. I tell the kiddos that if they meet the goal that they will earn the character and a matching treat. The character cards look like this:
All week long (and longer if needed to achieve their goal), we practice our math facts. I like to use the free addition fact sheets found {HERE} at www.math-drills.com. Scroll down to number 9 and select single digit addition questions with focus digits. Then, print off an entire sheet of individual fact practice. Copy the sheet for your students, and then cut them into 4 days worth of practice strips. Easy Peasy Mac-n-Cheesy!

I set different goals for students. Often my tier 3 students are just working on getting correct sums while my tier 2 students may be more focused on correct sums in a given amount of time. If their goal is achieved, they receive the treat for their character and a little certificate in a Ziploc baggie. They take them home to share their accomplishment with their families. It is an easy and relatively inexpensive way to celebrate their work and communicate their progress to their parents. 

Here is a quick glimpse at the suggested treat list and little certificates that they can earn. 

You can grab the whole program as a freebie {HERE} in this Dropbox link! If you like this set, stay tuned, or follow my blog. I hope to post my Peter Pan themed subtraction set next. :)

Sunday, September 7, 2014

Doubles Facts Freebie

We are kicking off our study of addition fact strategies this week! I am using this little poem/chant to help my RtI students remember their doubles facts. I made this anchor chart to display in class as we recite the poem together. We are going to add in hand motions for each fact, too. The more visual and hands-on I can make their math instruction, the better, right? :)

We will also add this printable copy to our interactive notebook. This freebie includes a color and b/w version. I hope it will be helpful to your sweeties, too. Click {HERE} to download your copy.


Hope your year is off to a great start!

Saturday, June 21, 2014

Touch Math Number Posters Freebie

I have the privilege and challenge of teaching 2nd grade RtI students. With very few exceptions, fact fluency is extremely difficult for them. Particularly when students have been identified as having a low IQ or being a "slow learner", automaticity is not so automatic. Therefore, we have implemented Touch Math as one of our research-based interventions. I love this method for a few reasons. 
  1. Many of my students are embarrassed about adding or subtracting on their fingers when other students' pencils are just flowing across the page. This method eliminates the need for finger counting.
  2. The students learn to associate the value of a number with it's numeral. The 2 has two dots. They reinforce that connection every time they add or subtract.
  3. This strategy works for addition, subtraction, multi-digit addition/subtraction, repeated addition/subtraction, and column addition. These struggling students can have one go-to strategy for all of their 2nd grade computation standards.
You can find out more about Touch Math {here}.

I had a set of touch number posters, but I was unhappy with them for two reasons. First of all, they didn't match my room decor, and I am all about things being "matchy matchy". Secondly, I do not agree with the way Touch Math has students tap on the number four. Their four looks like this:
That method works until a student encounters a font that prints a four like this:   4. Then, what should they do?  So, I switched up the touch dots on a four so that it will work for either style. Other than that, these posters follow the prescribed Touch Math method. 

You can grab your own set of these posters by clicking {HERE}. I hope that they will be useful to you! Do you use Touch Math? What do you think of it?

Wednesday, March 19, 2014

My Favorite Finds #2

Okay y'all, I am keeping it real here when I tell you that I almost hyperventilate when the time comes to teach  3 digit subtraction with regrouping to my 60 RtI babies!  You add in a full moon this week and it is the perfect storm! However, there is a site that has saved me from breathing out of a paper bag for years now!  My RtI and Inclusion kiddos are often very visual and need to truly see how math works. However, staying focused and using base-ten blocks at the same time can be a little or maybe A LOT more than I can expect of them.  So, this presentation is a happy little compromise!  To save you some trial and error and a boat load of time, I made a little tutorial to go with this FABULOUS site.  Click HERE to check it out!  They have TONS of virtual manipulatives, people, TONS, I say! This is how the site looked on my SMARTboard today.
The kids sat in the floor with their question sheet on a clipboard. We built and solved the problems step by step.  It was a magical moment when one baby said, "I finally know what this is all about!" As Junie B. would say, "My eyes got a little bit of wet in them!"  I hope this is helpful to you!  Enjoy!
\


I would love to hear from you if you give this a try!  

Thanks!